Showing posts with label Hollie. Show all posts

Tuesday, 15 March 2016

Deconstruction - Actors

For this next post I chose to deconstruct a few of the main characters from the film 'Scream 4.' This is because the characters in this film are teenagers aged close to those in our film opening so are relevant.


 'Ghostface' - Roger L. Jackson,  Dane Farwell
In this film, the killer is very similar to ours in the way that their identity is hidden through dark clothing and a hood. The use of a scary mask is also an effective idea because it builds more mystery and fear.


Sidney Prescott - Neve Campbell
Just like in our film opening, the main character of 'Scream 4' is a young, innocent, teenage girl. She is used as the main character but not only is she a young and attractive female, but she is also very vulnerable so plays an effective victim.


Gale Weathers - Courtney Cox
This character is a female subverting common representations of her gender, as she appears to be an ambitious, strong journalist and writer. To begin with she is portrayed to be an antagonist, but eventually joins 'Sidney' to help stop the murders.


Kirby Read - Hayden Panettiere

This character is another young, attractive female teenager who ultimately ends up being one of 'Ghostface's victims.


This deconstruction helped provide us with more of an understanding towards the use of young teenage characters in order to capture a corresponding age-group as our audience, since this film is rated a 15. 

Thursday, 25 February 2016

Evaluation

Overall I think that our film opening was successful in meeting the generic conventions of a slasher horror and including a variety of camera angles, shots and editing skills.

What went well?
I think that our group had very good teamwork and communication skills as we all worked well together and shared the workload equally, remembering to bring our required props and equipment to the filming day and each taking turns to film shots. Our film opening included a wide variety of camera angles and shots which made it look more professional and successful. It also conformed to the genre we originally set out to make because of the isolated location, vulnerable female victim, and the use of a dagger and gore.  We worked hard on achieving a more successful second film opening as the first was not good or long enough, this meant we worked on our improvements and made the second attempt much better. For example, we had a lot of footage to use and edit, a variety of camera angles and editing skills, and improved acting skills.

I also think that the production companies was a success and looks professional within our film opening. Furthermore, the title 'The Woods' was successful as it was made effectively on photoshop. It also appears at the end of our opening with a loud 'boom' sound to make it more effective.

What could be improved?
Obviously the first the attempt did not go well at all because there was not enough footage which meant it did not reach the time requirements, did not include enough shots or angles, and was not a high enough quality of filming. This therefore led to inconveniences as we had to go out and re-film the whole thing again,

Another area of our final film opening that could be improved is the editing of it. I think that we could have made the titles more effective by adding transitions and effects on them so that they bring more to the film. I also think that we should have added in a more dramatic soundtrack towards the end of the opening where the chase scene begins, in order to build suspension and create a more tense atmosphere.


Feedback

These are some examples of the sheets which our peers gave us feedback on after watching our film opening.


Sound Editing - Improvements

The sound on our film opening was one aspect which needed a lot of improvement. It was too quiet in certain areas which really needed more dramatic music, and certain sounds such as the twig snapping and girl screaming needed to be louder. As well as this there was some background noise which our peers picked up on and needed editing out.

This is the editing of cutting the background noise in the dog scene:


To improve the non-diegetic soundtrack we added in more of the same soundtrack but only a certain section. This made the ending more dramatic and build up more suspension which improved the quality and ensured there were no more silent sections.

This is the added in sound effects and soundtrack:


We also added in another soundtrack to build tension as the killer catches up with the girl to make it more effective. The sound comes to a sudden stop, and then quickly builds up again as the girl nears her death and is killed.

This is the added sound creating a more dramatic and effective ending to the opening:


Opening Credits - Improvements

We received a lot of feedback on our opening credits stating that they needed to be longer and given more interesting effects. To begin with we only had our three names as opening credits which appeared at equal intervals in the first minute of our film opening. They flashed in at different positions around the screen, for example:


After inserting these titles we then added in more opening credits so that there were more appearing throughout the film opening. These included another actors name who was not in our group, the Director of Photography, Producer, Co-Executive Producer and the editor. These were inserted between shots on a black background equally spread throughout and the named titles were placed at different locations around the screen.


To finalise we ensured these were all equally spread out throughout the film opening, also making sure they did not interfere with any match-on-action shots.

Wednesday, 24 February 2016

Opening Credits - Titles

After completing all the footage editing, we had to add in opening credits throughout the film opening. These titles included our own names and other actors and producers.

We came to the conclusion that the first name would appear five seconds in, so that they began early and were equally spread throughout. We then decided that there should be another five second gap the next, so that they had an equal time length between each title. Each name was also edited to appear on the screen for an average of 4 seconds, so that they did not drag but the audience had enough time to read them. This also meant that they were all able to fit in to the time frame of our film opening suitably.


Feedback

After submitting the first draft of our film opening we received peer feedback to find out what could be improved. The areas that they wrote about were the genre, sound, editing, titles, what the liked, and what they thought could be improved.

Most of our feedback mainly focused on the editing, titles and sound which needed to be altered or improved. The majority of our peers recognised that our film opening was a slasher horror and identified some of the conventions, such as the blood, dagger, female victim and an isolated location which was positive.

A major aspect which we received a lot of feedback on was the sound. The positive feedback was based mainly on the girl's scream and the footsteps which were said to be very effective. The non-diegetic soundtrack used was also liked by many as they said it worked well in building suspension and fit the film opening well. However, the majority of feedback suggested that it should get louder and more tense towards the end as the next killing approaches. From this we knew that we needed to add in the most dramatic part of the soundtrack and increase the volume of it.

Most groups gave positive feedback on our editing and said that it all worked really well, ran smoothly and contained a wide range of camera angles and shots used which made it successful. The match-on-action and POV shots were favoured as they were said to be very effective and worked successfully. Two criticisms we did receive were the length of some shots; such as the girl removing her jumper and the dog running. This let us know we had to crop these shots further.

We received lots of compliments on our main title 'The Woods' which was said to be simple but very effective. However, most groups told us that we needed a lot more opening credits throughout the film opening to make it look more successful and professional. One group also suggested that we could be more creative with the positioning of some of the names.

One aspect which most groups really liked was the use of the dog as an actor, making it more realistic and unique. However, the main improvements we have realised we need to make are adding in and improving the sound - diegetic and non-diegetic.

Monday, 8 February 2016

Shooting Script

A shooting script was needed in order to prepare our filming beforehand so that we did not forget anything and were able to manage our time to get all our footage filmed in one day.


Meeting day: Saturday, 16th January 2016

Meeting time: 11.00 AM

Meeting place: Gemma's house - Close to our chosen location for filming


Travel Arrangements: Hollie, Louise and Ashleigh all traveled to Gemma's house by car separately. This is where we all met, gathered everything we needed, and made our way to the woods with the dog which took about 5-10 minutes to walk.


Responsibilities:

Hollie: Dagger, phone

Ashleigh: Camera & tripod, black boots, black jacket, black hooded coat

Louise: Fake blood, ripped top in blood


Actors:

Ashleigh: The killer

Louise: Girl who gets killed

Gemma: Dead girl's friend - She is not part of our group but is a friend who was able to help us by acting in our film opening, bringing her dog, and getting to our location.


Sunday, 7 February 2016

Editing - Sound

Once we had cropped and edited our footage, we realised not all of the sound was to a high enough quality due to problems such as background noises when filming. We began searching for sound clips and sound effects to use. To do this, we used 'SoundCloud' to search and download appropriate sound effects which were;

A girl's scream


A twig snapping


We downloaded them using clip converter and then were able to save and insert them into our film opening. We placed them at specific scenes and trimmed them to fit effectively.

Editing - Production Companies

We had to include two production companies at the beginning of our film opening; these included one professional and one of our own.

The first one we added into our footage was the professional production company 'BlumHouse Productions'. We chose this because it fits well with our horror film, was one previously researched and was also a suitable time length. We downloaded and saved it from YouTube, so we were then able to insert into FinalClip Pro along with the rest of our footage.


We then inserted Ashleigh's own production company Because we came to an agreement that it was the best design and most effective. Our own production company is named 'Mirror Productions':


Editing - Footage

To begin editing we first gathered all of the correct footage required and uploading it all to FinalCutPro. Then we placed all the clips in chronological order as shown below:


Once everything was in the correct order the next stage was to crop the footage. We did this by using the blade tool in the programme. This included cutting down certain shots to reach the desired time limit and to also cut out any mistakes or unnecessary footage.


Then all the footage could be put together and in the correct order and run smoothly. 


Storyboard

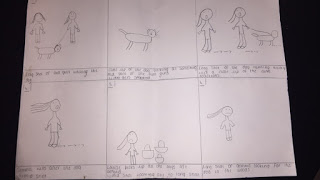
Before any filming took place, we first planned it all on a storyboard consisting of drawings of the shots and annotations of the angles and time frames. Our original storyboard was too basic because it was not long enough and did not include a variety of enough shots, therefore was a contributing reason for why we had to film a second time. So we had to re-drew another storyboard for our second film shooting with the added improvements.


The improved storyboard meant we had a clearer plan to follow when re-filming so we were able to complete it all a lot more quickly and efficiently. It also enabled us to film a lot more shots meaning we had a variety to edit. Overall the improved storyboard consequently increased the quality of our practical work.


Tuesday, 2 February 2016

Refilming Evaluation

After the first attempt at filming we realised there was not enough sufficient footage to make our film opening successful. We scheduled to re-film, this time including more camera angles and shots to improve it. However, the practical side of this caused us problems as it took up more time and caused inconvenience for us because we had to re-film the entire thing.

It was not possible to use the same location as it was different to reach the original location easily in the first filming attempt. This meant we had to find another setting which took up time. Another problem was that one of the girl's acting a main part in the film was unable to re-film, so we had to find someone else in the short time that we had.

Despite these problems faced, the re-filming was actually a lot more successful the second time than the first. We included more varied camera angles and shots, made the footage longer, and overall collected a lot more professional looking shots which we were then able to cut and edit.


Here is a photo from the day we filmed, it shows the first scene being shot and the location we used:


Sunday, 3 January 2016

Filming Evaluation

What went well?

Our chosen location and time to film worked well because it was not too dark, yet it was still dim enough to look eery and create a creepy atmosphere. Since the location was close to one of our houses, it was easily accessible and so we were able to complete all our filming in one day.

I also think that we included a lot of different camera shots and angles throughout our filming to keep the film opening diverse. It also helped in building tension and keeping the suspension high.


What to improve?

I think one area of improvement is the quality of camera filming. At certain points the shot was not completely straight because of the uneven wooded location and appeared wonky or a little shaky, making it look unprofessional.

Another improvement to be made was the standard of acting; although we are all unprofessional actors, it was found to be very difficult to keep the filming at a high quality when it was difficult to stay so serious.

Choosing an outdoor location had its disadvantage because due to the time of year the weather was very unreliable. It was extremely cold and slightly rainy, so made it even more challenging to get all of our filming completed in one day because we were so uncomfortable, particularly for those acting in the film opening in very thin costumes. 

Wednesday, 16 December 2015

Practical Task - Costume

For this practical task I decided to focus on the killer's costume in our film opening. The killer is going to be kept anonymous which means their identity is not shown, therefore the costume needs to ensure this.

So I decided that an all black attire would be the best look for the murderer. This way they are kept completely unidentified and will be hidden and masked within the dark shadows of the woods. One important aspect of the costume is the concealing of the killer's face. I think that an idea way to keep their face hidden from the camera is for them to wear a dark hood which hangs low over their face.

Here is a possible dark hooded jacket that could be used for the costume:


Here are also some black boots that could be worn to finish the outfit:

Sunday, 13 December 2015

Camera Angles Deconstruction

Since my group’s film opening is a slasher horror chase scene, I decided deconstructing the camera angles from this chase in ‘Halloween 2’ would be useful in gaining ideas for our own.

This is the clip of the scene I used to deconstruct:


This chase scene begins with the killer shown in a low angle, making him appear superior and powerful. Since he is dominating the screen and shown to be sinister, this angle suggests to the audience that he is the villain.


This close-up angle is effective because it is shows the killer’s feet walking down the stairs. This is a really good idea and effective way of using the angle because it creates a sense of fear and builds tension for the viewer. We can see that the villain is chasing her, but we do not directly see him.


This long-shot is used to show the audience how the victim is desperately trying to escape. In this angle we are able to see her whole body struggling to get away, but also her distraught facial expressions.


The next angle is a close-up which is used to show the girl’s facial expression. In this shot we can see that she is very scared which effectively shows her fear and portrays her as the victim.


The close-up angle of the girl’s feet struggling to get away is also really effective in establishing she is the victim. It emphasises her desperation to get away and again suggests that she is the victim in this scene.


The long-shot angle is used here to again show the girl in desperation to escape the killer. Here we see her entire body running towards the camera, emphasising her struggle and vulnerability.


This mid-shot is used to show the villain following the girl. The use of this angle is effective because we still cannot see the identity of the killer which builds tension


Lastly, an extreme long shot is used to show the victim. This effectively shows how alone she is, as we are shown the isolation of the scene. This suggests she is vulnerable and again portrays her as the victim.


This deconstruction task was really useful because it gave me some ideas for our own opening scene. I particularly liked the use of the close-up shots showing the character's feet, and the low angle to portray the dominant villain. 

Wednesday, 9 December 2015

Practical Task - Props

For my next practical task I decided to focus on the weapon that will be used in our opening scene.

In our film opening we planned to have a killer who has just killed a girl and chases another. This meant that a weapon needs to be used and must be realistic and scary.


We decided that the best weapon to use would be a dagger, as a stabbing would be the easiest to film in a wooded setting.


This is the dagger I decided would be ideal.


Saturday, 5 December 2015

Typography Deconstruction

For my next post I deconstructed the typography from various slasher films.


The first is the title from ‘Saw’ and is written in an uneven capitalised sans serif font which is basic but also creates a snappy and tense feel. The use of the black, brown and green colours make it quite unappealing to the eye and creates an uneasy feel. Furthermore, the two cut fingers included in the title establish that the film is a slasher, because it looks gory and disturbing.


This is the title from ‘Scream’ which I analysed next. This typography is written in a white sans serif font which makes it really stand out. There also appears to be a red glow around the title, which could possibly suggest it is a slasher because it’s the colour of red, and it also emphasises the word ‘scream’. The black background creates a mysterious feel as it creates suspension and unknowing, foreshadowing the film’s story.


The next title is from the film ‘A Nightmare on Elm Street’ which the serif typography effectively creates an old and outdated appearance. The use of the colour red represents blood which is obviously going to be in the film, and the effectiveness of the blood splattering around the title creates a gory effect. This also makes it look messy and uneven which could suggest the unknowing suspension in the film. 


This deconstruction task was useful as it gave me inspiration for possible typography styles my group could use. The use of the blood red colour is effective for a slasher horror, and I also think that using a smudged looking font would work well in representing blood and establishing its genre.
 

Wednesday, 2 December 2015

Practical Task - Fake wound

I completed another fake wound practical task, but decided to create an idea that could potentially be used in our video opening. Since it is a slasher horror, there is a dead girl who has been stabbed, so I decided to try and create one of the stab wounds she may have on her.

To begin, I collected all the equipment I needed; red felt tip, cheap eye-shadow and brush, gluestick.


I decided to use my arm to practice on, although for our opening it would probably be on her stomach or back. I firstly drew a long thin line using the red felt tip onto my arm.


I then added some dark brown eyeshadow around the line to make the wound look darker and scarred.


My next step was adding the glue along both sides of the red line. This is an effective way of showing the broken skin which has been raised due the cut.


I then went back over the red line with the felt tip to enhance the colour, I also used the pen to add red colouring onto some of the glue which created the bleeding effect.


Finally, I added some more eyeshadow around the glued area. This time I used a  red and pale colour to show the different patches of skin and make it more realistic, as well as a very dark colour to make the wound look dirty from the woods floor.


This was my final outcome:


What went well?
I think that I successfully created the right effects with the use of eyeshadow. The colours all worked really well and I think the dirtied effect was successful and worked well, especially considering out opening scene idea.


What I could improve?
I think using a special wax instead of glue would have made the wounds look a lot more realistic because it wouldn't have been so messy to work with. I also think that the wound appears to bright and so a darker red pen could have been used to make the blood look more realistic.