For this practical task I decided to focus on the killer's costume in our film opening. The killer is going to be kept anonymous which means their identity is not shown, therefore the costume needs to ensure this.
So I decided that an all black attire would be the best look for the murderer. This way they are kept completely unidentified and will be hidden and masked within the dark shadows of the woods. One important aspect of the costume is the concealing of the killer's face. I think that an idea way to keep their face hidden from the camera is for them to wear a dark hood which hangs low over their face.
Here is a possible dark hooded jacket that could be used for the costume:
Here are also some black boots that could be worn to finish the outfit:
Showing posts with label Costume. Show all posts
Showing posts with label Costume. Show all posts
Wednesday, 16 December 2015

Sunday, 29 November 2015
Practical Task - Costume
For my next practical task I created a Slasher Horror themed costume. I decided to make the top of a stabbed victim, which is also my groups' idea for our film opening.
To do this, I firstly found an old white top because it would be more effective in clearly showing the blood and dirt. I also collected some scissors, red paints and a paintbrush.


Next, I used the scissors to cut into the top - I created a big slice at the front of the top to show where a knife had sliced through, then created a few more smaller ones, and a fourth on the sleeve.

I then ripped some of the top by hand. I decided to do this to show rips and tears from where the victim probably tried to escape.

I then mixed the two red paints together to make a deep red blood colour. I used the paintbrush to firstly paint over the top, specifically over the cut areas to show the stabbing.


Secondly, I hit the paintbrush to splash red paint over the top to effectively create a blood splattered effect.

Once the paint had dried, I took the top outside and draped it through mud to create a dirty look. This created the idea of the victim attempting to get away in a wooded area - which is the opening of our film.

This was my final product:

What went well?
I think that the splattered blood effect I created by splashing the red paint onto the top was really effective in creating a slasher costume. I also think that the use of mud and dirt on the top successfully made a more realistic look, and is ideal for our film opening.
What would I improve?
I think that using a thicker top would have been more effective in showing the tears, slashes and paint splatter because the one I used was laced so already had holes. I also think that using fake blood would have made it look more realistic rather than mixing paints, because it looked too bright to be real blood.
To do this, I firstly found an old white top because it would be more effective in clearly showing the blood and dirt. I also collected some scissors, red paints and a paintbrush.


Next, I used the scissors to cut into the top - I created a big slice at the front of the top to show where a knife had sliced through, then created a few more smaller ones, and a fourth on the sleeve.

I then ripped some of the top by hand. I decided to do this to show rips and tears from where the victim probably tried to escape.

I then mixed the two red paints together to make a deep red blood colour. I used the paintbrush to firstly paint over the top, specifically over the cut areas to show the stabbing.


Secondly, I hit the paintbrush to splash red paint over the top to effectively create a blood splattered effect.

Once the paint had dried, I took the top outside and draped it through mud to create a dirty look. This created the idea of the victim attempting to get away in a wooded area - which is the opening of our film.

This was my final product:

What went well?
I think that the splattered blood effect I created by splashing the red paint onto the top was really effective in creating a slasher costume. I also think that the use of mud and dirt on the top successfully made a more realistic look, and is ideal for our film opening.
What would I improve?
I think that using a thicker top would have been more effective in showing the tears, slashes and paint splatter because the one I used was laced so already had holes. I also think that using fake blood would have made it look more realistic rather than mixing paints, because it looked too bright to be real blood.
Monday, 23 November 2015
Practical Task - Costumes
For my practical task I decided to create a t-shirt which we plan to use in our coursework opening scene. I decided to create a t-shirt covered in blood and mud to make it look old and worn and to show that the person wearing it has been stabbed and injured.
Step 1:
I began by cutting a few holes into the t-shirt which is where the person would've been stabbed and cut. I made sure that they were big so that the wounds looked serious and painful.
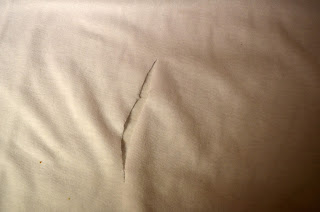


Step 1:
I began by cutting a few holes into the t-shirt which is where the person would've been stabbed and cut. I made sure that they were big so that the wounds looked serious and painful.


Step 2:
I then added fake blood around the cuts in the shirt. I made sure that the blood was darker where the material was ripped and lighter at the edges to add effect. I also made sure that it was random and messy and that there was a lot of blood in order to make sure that it looked as realistic as possible.


Step 3:
I then sprinkled and smudged cocoa powder into the t-shirt to make it look dirty and muddy to suggest that the person had been wearing it a while or that she had struggled when she was killed. This made the t-shirt look a lot older and ragged and make it look like it was worn during the attack.

Step 4:
I then splattered more blood onto the t-shirt randomly, creating blood stains which will help to suggest that the girl was attacked with a lot of force. This also made the t-shirt a lot more effective and realistic as it added to the t-shirt by making it look dirtier and ruined.


This is the final product:


What went well?:
I feel that this practical task went well as the blood looked dark and realistic and the use of the cocoa powder was successful as it made the t-shirt look a lot more ruined and uneven. I also like the blood splatters as it added to the t-shirt by making it look like the stab wounds were applied with force.
What could be improved?:
To improve this I feel that I could've added a few more smaller cuts and rips in the t-shirt to make it look more ruined and add a few more wounds to the person. For example, by ripping one of the arms significantly and making it very obviously ruined so that the attack looked more serious.
Tuesday, 10 November 2015
Practical Task - Costume - Louise Hyam
Practical Task - Costume for horror film:
For my practical task I am going to make a costume for a horror film. The costume that I have decided to make is a top or item of clothing that would be seen in a horror film after someone has been injured. The item of clothing that I decided to make is a top it is a top that isn't in good condition and has all sorts of stains on it to help represent the genre.
Things I used to make it:
- Plain white t-shirt
- Fake blood
- Scissors
- A tea bag
- Makeup
- Rubber gloves
Firstly I found a top that I wanted to use and I chose a white top so that stains and other things would mark well onto it.
This is the white top I chose to use:

Secondly I then cut it to make it look more worn and make it look more scary, I made holes in the top and I also cut parts of it just to make it look more worn than just a normal t - shirt.
I got the scissors and just cut into the material of the t - shirt to make holes and make it look more scary.
The holes and rips are shown below in the pictures:


Thirdly I added fake blood to make it look like whoever would be wearing the t - shirt would have been involved in some kind of incident and this adds to the effect of a horror film and conforms to the common representations of a horror film as blood is usually shown. I added fake blood in random places on the t - shirt so it doesn't make it look as prepared. I did this by squirting the fake blood onto the t - shirt and using rubber gloves to smudge the fake blood and make it look more natural instead of it looking likes its been placed on. After doing this I waited for it to dry.
This is how it looked after the fake blood was added:
Before being smudged:

After being smudged:


Lastly I used a teabag and makeup and added this onto the t -shirt. I did this by adding random blotches from the teabag onto the t - shirt to make it look dirty and worn in this would suggest the person wearing it would have been wearing it a long time. I also added makeup to add to the worn in effect I dabbed bronzer and foundation around on different areas of the top.
This is shown below in the picture:


Final product:

Evaluation:
What went well?
I think one thing that went well is the fact that I used lots of different techniques in order to make the top suitable for the genre. I think using fake blood and teabags and makeup to stain the top all worked well together and helped complement each other.
What would I improve next time?
Next time if I was to do this again I would make sure the shade of blood looks more realistic instead of a bright red and mix more colours in order to gain a more realistic looking blood colour.
Subscribe to:
Posts (Atom)