Saturday, 10 October 2015

Practical Task - Fake Wounds

To begin my practical task I first went on Youtube to look for inspiration and found this video tutorial on how to make fake cuts and wounds and used it to help me:


The first thing I did was collect all the equipment I needed to create the fake cuts. These were scissors, fake blood, scar wax, foundation, lipstick, eyeshadow, sponges and brushes.

Step 1:
I began by placing a small piece of scar wax across the hand  and blending it into the skin so there were no lines where it was added. I made sure that I didn't use too much wax so that it was as flat to the skin as possible so it wasn't raised from the skin too much.
Step 2:
I then used the scissors to make a cut in the scar wax. I used the scissors to open the wound to ensure that I could add the blood and colour to it easier later on.

Step 3:
I then added a foundation of the same colour as the skin to make hide the scar wax and blended it in to make it look more life like and realistic.

Step 4:
I then used a small brush to add a dark lipstick to the inside of the cut made earlier. This will create a dark base for the fake blood which will be added later on.

Step 5:
I then used a fluffy brush to add a dark red eyeshadow to the skin in and around the cut to make it look irritated and slightly bruised, this also helped to hide where the foundation hadn't covered the scar wax very well and added contrast to the skin.
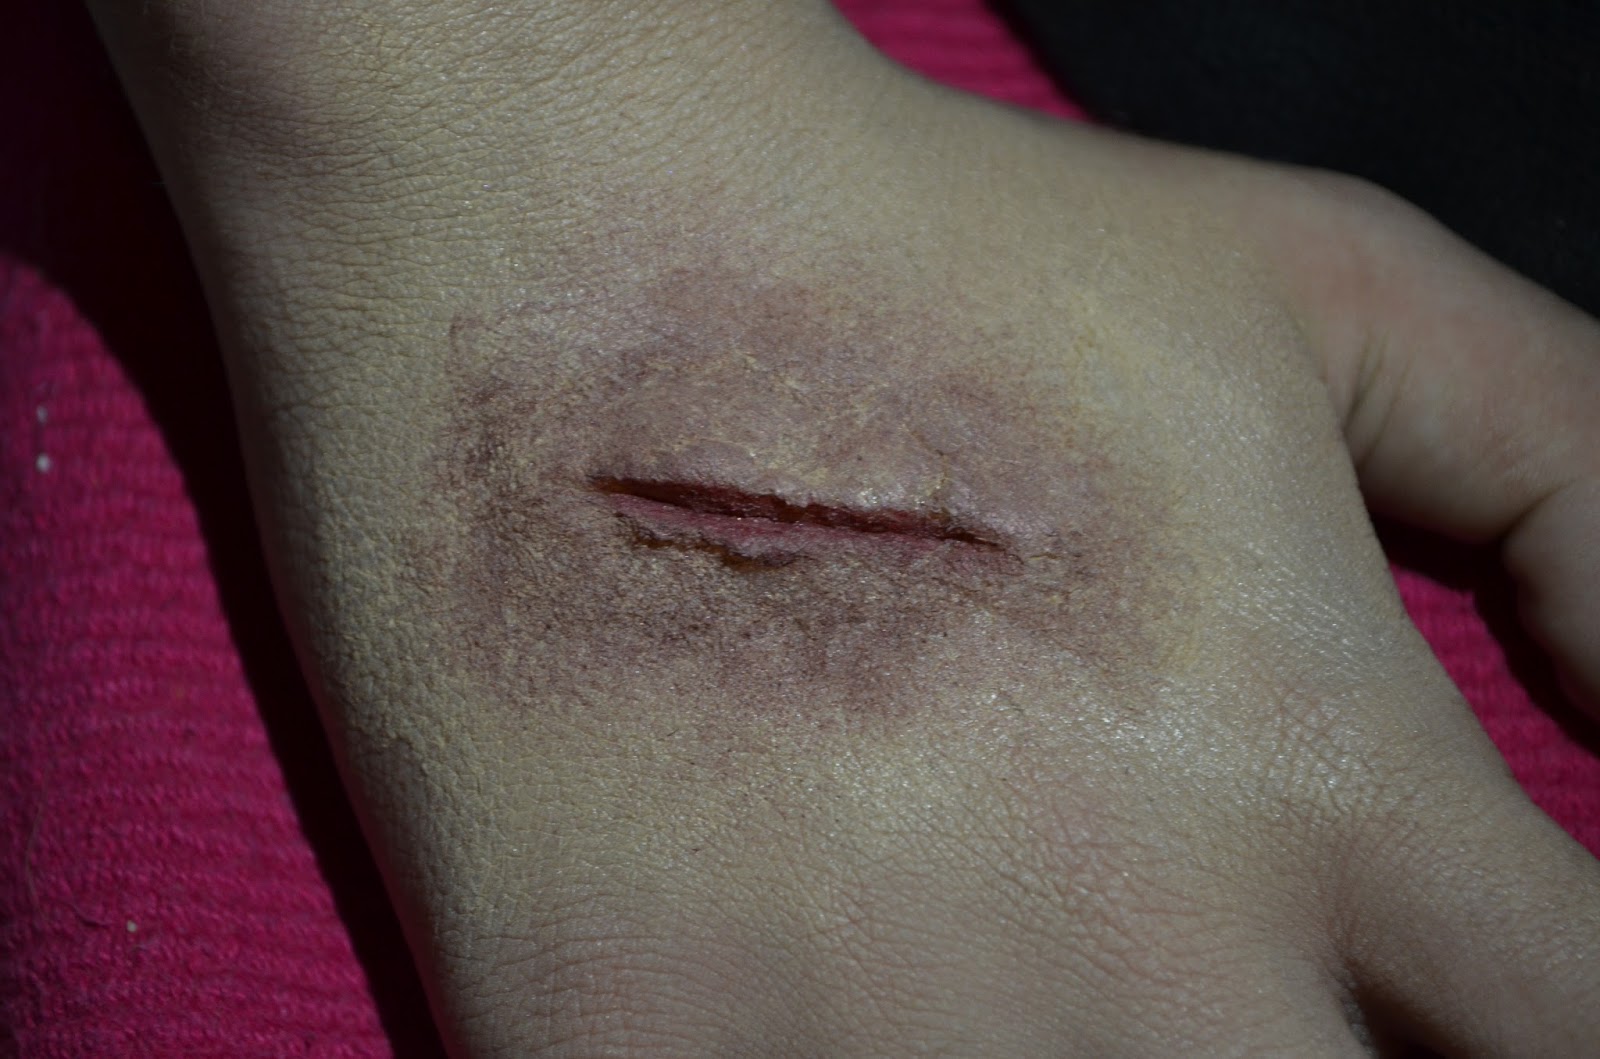
Step 6:
I then used a brush to add fake blood to the inside of the cut, this enabled me to add it precisely and ensure that I had reached all the cracks and indents in the scar wax.

Step 7:
I then used a sponge to add more fake blood in and around the fake cut, to make the wound look more realistic and messy as if it was a real cut.

Evaluation:
I think that this Practical Task was successful as I was able to create realistic wounds using the video tutorial found on Youtube by using the materials and techniques in the same way but on the hand instead of the face. I think I was successful in using the brushes and sponges when adding the foundation and make up to add just the right amount colour to the wound to make it look life like so it wasn't too dark and unrealistic. 
However, if I was to complete this task again I think I would use a different substance as the fake blood as it was quite bright and red and didn't look real when first added. I would also add some more lipstick to the wound to make it a darker red which may also make it look more life like. I also think I would improve how I added the foundation as when added it looked patchy where it was put on top of the scar wax, but I managed to cover this up later on when I added the fake blood around the wound.

Deconstruction Task - Woman in Black

This is the Woman in Black opening scene:
 

Woman in Black is a supernatural horror film. The opening scene of the film begins with a scene of a group of young girls playing, a diegetic soundtrack has been used as the scene begins which is eerie, creepy and slow with the use of strings. This is effective as it immediately creates tension and suspense in the opening scene as the slow music doesn't fit with the scene of the young girls playing with their dolls, which makes the viewer realise that this is not a 'normal' situation as the only sound used is the slow music, which sounds like a set of bells, wind up toy or nursery rhyme made to sound scary and to help build tension.. There is very little diegetic sound in this scene as the music is the main focus, however diegetic sound is used when the children get up and walk over their toys, crushing them and a scream can also be heard once the children have jumped out of the window, making the scene tense and eerie.


The is a wide range of different camera angles used in the opening scene which are effective throughout. At the beginning there are a variety of different close up shots showing the girls dolls and toys whilst they play with them. A mid shot is also used to show the girls smiling and playing together showing their facial expressions to show that they are enjoying themselves as 'normal' girls would, despite the eerie music suggesting otherwise. There is also a use of a long establishing high angle shot to show the girls in what looks like a playroom surrounded by their toys. The use of a high angle shots makes the children seem vulnerable and small as if they were in danger or being watched making the scene seem tense.


The editing in the opening scene is very effective as it has been slowed down so that it works well with the slow music being played. The children are filmed looking up at the camera as if someone was standing there, this them cuts to them turning their heads to look at the window next to them and a shot of the window is shown. The use of this editing to make the girls move and play in slow motion is effective as it adds suspense to the opening scene. Match on action is also used in the opening scene as the three girls stand up together and walk towards the window, match on action is used as close ups are shown of the girls hands and feet as they stop what they are doing and stand up, which continues as the girls are seen walking towards the window towards and away from the camera and open the windows and stand up onto the window ledge before jumping.


The mise-en-scene in the opening scene is very detailed as the film was set in the Edwardian Era. Close detail to the props and surroundings is shown in the opening scene as the children have a tea party in the attic surrounded by Edwardian toys such as china dolls and old fashioned pushchairs and rocking horses. The style of the furniture in the attic also suggests that it is set in the Edwardian Era as well as the close attention paid to the girls outfits which was common in this Era. All this put together creates a scene which shows the time in which the film was set and also helps to make the opening scene scarier as toys used in the film such as china dolls are often seen as creepy.


Practical Task - Fake wounds

Fake Wounds

For my practical task I chose to practice creating fake wounds and cuts by following this tutorial on YouTube: https://www.youtube.com/watch?v=YgdpzgORzhU


All I needed was basic eye-shadow makeup, red pens, and a glue stick.

The first stage was to use a red sharpie pen to draw a thin red line as the base to work from.


The second stage was to apply eyeshadow. I was able to use very cheap basic eyeshadow and I first applied a dark grey. This set the base colour, and then I added red and brown.


The fourth stage required spreading a small amount glue along the red line. This was to give the effect of skin lifting up due to the cut. Once this was applied I waited a couple of minutes for it to dry.


Once the glue was almost dry, I then used red felt tip to colour over and in between the glue, defining the original red line. 


After this, I applied a bit more eyeshadow as some had worn away. This time I included a small amount of blue along with the dark colours and red. This gave the effect of slight bruising around the wound:


I then repeated these steps a few times for practice. This was my final result:


Evaluation:

I found it really useful following the YotuTube tutorial as a guide because it gave me clear step-by-step instructions. I was able to follow these well and successfully carry out my own with practice.
Specifically, applying the eyeshadow and blending the colours to give a bruised, wounded effect went well. I was successful in adding just the right amount of makeup and achieving an ideal balance of colours.

I particularly found it difficult to carry out the gluing stage. I think this because it was quite a messy task and I struggled to get the right amount of glue. The point of this was to create the effect of skin lifting up from the wound, but it took me several attempts to achieve this.


I think that if I got to do this again for my opening scene, I would take a lot more time to make the fake wounds a success. I would definitely need practice on certain stages such as the gluing and the felt tip, and I would also use a better brush to apply the eyeshadow for a more realistic effect. 

Deconstruction Task - Sinister

Sinister Deconstrction - Opening scene

This is the opening scene of Sinister on YouTube - https://www.youtube.com/watch?v=gf1S81eEqNQ


The film sinister is a supernatural horror film. The opening scene begins with a black screen whilst crackling diegetic sounds are played to create the fuzziness of an old fashioned projector. This immediately creates a mysterious and tense atmosphere, which us a common convention of supernatural horrors.


The scene is shortly cut to a rolling tape of four people hanging from a tree. The fact there are two adults and two children all seen to be wearing normal clothes suggests they are just a ‘normal’ family like the audience watching, creating even more suspense and the sense of a realistic film This indicates to the audience that the film is expected to contain violent or murderous scenes, again commonly found in supernatural horrors. This is so that the audience anticipate fear from the very beginning scene.


The use of colours in this clip subverts common representations because supernatural horrors usually consist of very dark scenes. However, it conforms again as the scene unfolds to be even more disturbing as the four characters are elevated above the ground and struggling for breath. Alongside this is the non-diegetic eerie music played in this scene to create fear and tension. This music and crackling sound of the projector starts to get louder as the characters reach their death.


The title ‘Sinister’ is then sprawled across the scene after the death of the four characters. It has been edited on and is in a messy, handwritten looking font. By this point, the audience do not know what is happening and suspension has really built up. This ultimately prepares the audience for the rest of the film which is about to start.


Thursday, 8 October 2015

Preliminary Task - Editing Evaluation

What did we do?
After planning and filming our preliminary film, we uploaded the clips onto the computer and inserted them into Final Cut. This software on the Mac firstly enabled us to put all the correct scenes into chronological order by dragging them down to editing and then cropped any so that the film ran smoothly. We did this by cutting scenes into two and deleting the part which we didn’t need as shown below:


We then added in more effects to improve the video. We first inserted a music clip downloaded from the internet which played throughout, and added a slow motion effect on the final scene to enhance the quality of our film. We then added in a title which appeared on the opening scene, and credits that appeared at the end.

This shows the music file inserted into the clip and the title at the beginning:


What went well?
We were all able to easily use Final Cut to insert, crop and edit all the scenes. This meant that when we watched the clip back, it ran really well and the match-on-action was very smooth. We also enhanced the sound on the speech scenes by increasing the volume which produced a clear sound quality.

This is the scene of the match-on-action shot where one of the characters is seen entering a room through the door:


Problems Encountered?

We did have a few problems with adding the titles to begin with, and it was challenging to make them fit with the film and look professional. We also had a limited amount of scenes to use which meant it was difficult to add in many effects without it looking too overloaded. Another issue was finding a music clip that went well with the film.


If you got to do it again?
If we had the chance to edit our preliminary again, we would add in a lot more effects such as a more professional title/opening and credits. We would also make more changes to the music like fading it out as the film ended. Another improvement would also be a variety of more effects, we only used slow motion for the end scene, but a lot more could have been used such as fast motion, CCTV effect, or filters. 

Sunday, 4 October 2015

Preliminary Task - Planning Evaluation

Evaluation for Preliminary Task - Planning
What was done? 
Firstly we were told what we had to include within our filming task and we had to make sure that all of these were shown on the storyboard and were also in the film. After being told what our film had to include as a group we had to think about what are film was going to be about and how we were going to include all of the necessary requirements. As a group we came up with a plot line of a girl getting annoyed at her friend because she kisses her boyfriend. Then we decided after deciding on the plot how we would include with regards to filming and camera angles the match on action, shot reverse shot, 180° rule and an over the shoulder shot. In our storyboard we had also had to include how we would demonstrate the other things that needed to be included like opening a door, someone crossing a room, someone sitting down in a char opposite another character with whom he/she exchanges a couple of lines of dialogue. After we had the plot and knew everything that needed to be included we started our storyboard. We did this by drawing out the characters and making sure it follows the plot line. Then once we had drawn out the characters with the plot line we made sure that it included everything that was in the brief and also focused on making sure the storyboard demonstrated the different camera angles. After completing we decided if any props were needed and no props were required for our filming we then also had to decide who was going to take part in the film because it had to be people from our group so we picked two people to be in the film (Louise and Hollie) whilst we planned that Ashleigh would then do the filming. After deciding upon that we had to decide where we were going to film our film in relation to what our plot was and what was shown on our storyboard. We decided to use a classroom within the school because it had to be filmed within school time so we used a classroom because it matched our plot and was suitable for everything we needed to include.
Below is the storyboard that we made in the planning stage:


What went well?
Within our planning the part that went well was that we made sure we were fully ready for filming we made sure that we had the location sorted that we were going to use and planned who was going to be in the film so that it saved time on the day and we also made sure that we had any extra props that we needed if we needed any. When we planned our film we planned the dialogue that was going to be said between the two people in the conversation so that didn’t have to be decided on the day. All in all our planning went well because we used the planning time to make sure that we had enough time to film and we had everything sorted for the filming so we had our full filming time. I also think another thing that went well was that when we made the storyboard we included the camera angles and shots that we were going to use.  


Problems encountered:
The problems that we encountered were that we had very limited timing and space that we could use was also limited, as it had to be done within school time.  If we had longer time we would be able to make the film longer as it was quite short and we would have been able to add more detail if we had more time. Also if we weren’t limited to the setting that we had to use we would have been able to choose a more interesting location instead of using a classroom.
What we would change if we did it again:

If we could do the preliminary task again the things that we would change as a group about the planning stage is making sure that the storyboard is fully detailed. We would make sure that the camera angles are fully labeled on the storyboard and that specific camera angles that needed to be within our film were clearly labeled so when we were filming we knew exactly when we looked at our storyboard what camera angle needed to be included in what part of the film. 

Saturday, 3 October 2015

Preliminary Task – Filming Evaluation:

What was done?

After planning the plot of our Preliminary Task we began filming the various shots that we were including in our task. We had an hour to complete the filming for our preliminary task and were told that the video should demonstrate match on action, shot reverse shot, 180° rule and an over the shoulder shot. When planning we incorporated these shots into our storyboard and used it as a guide when filming. We filmed the task using a tripod and video camera in a separate room to ensure that there would be no other people in our shots. The tripod enabled us to reduce camera shake and make our film look more professional. In order to include the range of filming techniques we needed in our film we took a large amount of shots to create match on action and shot reverse shot scenes as well as trying to include a range of other filming techniques in our film to make it more interesting such as panning and tilting.
 
What went well?
When filming our Preliminary Task the majority of it went to plan. We managed to film the task within the set hour and included all of the set filming techniques that we were asked to demonstrate within the film. The match on action was filmed so that it could be easily edited together to show the person walking through the door as one fluid movement. This was also done with the shot reverse shot filming to ensure that when edited the shots were easily put together for the final film. We also ensured that we followed the storyboard so that we used the correct filming techniques and camera shots that we had decided to use when planning. We also used a range of different camera shots when filing such as a Medium Shot, Long Shot, Two Shot and a High Angle Shot. We also included a Pan/Track and Tilting when filming to make the film more interesting once edited together.
This is screenshot from the finished video showing the use of a long shot when filming.


These screenshots show the two match on action shots we included in our film to show the actress walking through the door into the other room.
This screenshot shows the scene where the actress walks across to room. This is also the scene where we used tracking to follow the actress as she moved.
This scene is where we used tilting and a high angle shot to show the vulnerability of the girl on the floor.
What problems did we encounter?
We didn’t encounter many problems when filming our Preliminary Task. The camera had full battery and the SD card had plenty of space so we had no technical issues with the equipment we needed to film our task. However, we did have problems finding an empty room and an area to film to video in as we wanted to ensure that we had no other people in the background when filming to make it look more professional. We also had to ensure that we didn’t distract other classes nearby when filming our task by making sure that we were quiet and didn’t cause distractions. However, as we were filming in an area where other classes were being taught, we had a problem with background noise as other people talking can be heard in the background of some scenes, in order to sort this we detached the sound in Final Cut Pro and deleted the sound all together as it wasn’t needed.

What would we do if we did it again?
If we were to complete this task again we would ensure that we focused more on the compositions of some camera shots as in the shot reverse shot scene the top of the actresses head was cut off in the frame, making the final seem less professional. We also decided that we would redo our match of action scene of the actress walking through the door into the room as we only included two shots. We feel that it could be further improved by adding more shots of the actress walking through the door by adding shots of her hand pushing the door open, which would also allow us to include more camera shots such as extreme close ups and a point of view shot.
This shot was from the scene where shot reverse shot was used and was the scene where we cut off the actresses head at the top.